Salve,
TL;DR
I’ll explain step by step how to create a static blog generated by Jekyll, hosted on AWS’ S3 and cached by CloudFlare in relatively few steps, using this very blog as example, it was created in 1 hour, if I discount the time I wasted trying to tweak CSS and waiting S3 replication due to errors on my part.
I’ll assume you’re already convinced that going static is a good option, I’ll probably expand the rationale behind this move in a future post.
Security warning
You take full responsibility by following these instructions, any problems or security breaches are on you, not me. Randy Bias suggested me to add some security tweaks using IAM, but it deserves its own post and can be added later. One of the nice things about this setup is that it’s pretty much read-only and as long as you don’t commit your AWS keys to the repo you should be pretty safe. Anyway, you should understand what’s going on and decide for yourself.
Pre-requisites
- *nix shell familiarity - this isn’t a “follow the screenshots” tutorial, I expect you to have some familiarity with using a shell, it works on both Linux and Mac, but it’s up to you to make sure things like Ruby or whatever language you decide to use are installed and running.
- Know your way around a static site generator - I recommend using Jekyll (Ruby #rules), but there are options in Node.js, Python, or you can just use a regular HTML/CSS site written on Notepad. Of course, the extra tooling will make some things easier, like setting up the commenting tool and social media sharing.
- AWS account - I’ll assume you already have one and has some familiarity with their dashboard, otherwise just sign up on their site and Google when you get lost. You will need you credit card, but you won’t spend any money if you’re a new customer, all you usage will fall into their first year free tier, unless you decide to register your domain with them. DO NOT commit your AWS keys to the repo.
- CloudFlare account - their basic service, which is awesome, is free, no need for credit cards
- Optional
- Uptime Robot account - also free, gives you an availability check every 5 minutes, it will save you time when you screw something up or have a problem with the infrastructure (mega rare). It’s basic but works pretty well, I recommend it.
- Google Analytics account - default analytics system, you should already be using it on other sites
- Disqus account - if you want to enable comments on your website you’ll need somewhere to put the data, and you’ll need some kind of backend to handle it. Instead of spending time reinventing the wheel just use Disqus or some other hosted comment tools, you will have some degree of lock-in, but the worst case scenario is that you’ll loose the comments, and nowadays they are an optional feature anyway.
- PObox account - if you want to receive e-mails with your domain you’ll need to configure your MX (mail servers) records, but keeping a mail server is a pain in the neck and mostly a waste of time. Assuming you would be happy to just forward the e-mail you get on this account to some other account, all you need to do is create mail aliases, PObox is a cheap service that offers just that. At the time of writing it costs $20/year.
Here we go.
Creating a basic Jekyll website
For simplicity sake, I’ll assume you’ll be using Jekyll, if you aren’t a Ruby person you can try Pelican for Python , Wintersmith for Node.js or whatever floats you boat, I never spent more than 5 minutes with anything but Jekyll.
Make sure you have Ruby running, I recommend using version 2.1 but I believe it should run on 1.9.3 and above, and that you have the bundler gem installed. Also make sure you have git installed. I ran all this code on a Ubuntu 12.04 (it’s old, I know) inside a Vagrant box, worked like a charm.
To speed up things and avoid getting into layout issues or spending time trying to make something pretty and responsive, I recommend you use a Jekyll template like the ones created by Michael Rose, in this case I’m using “So Simple Theme”, which is elegant and fits the round logo I cobbled together in 1 hour (my design/image editing skills suck). By the way, thanks a lot Michael, your theme is awesome and I appreciate the fact that you released it under MIT, the next beer is on me.
We’ll mostly follow the super clear instructions that come with the theme, just follow the steps:
Clone the repo:
git clone https://github.com/mmistakes/so-simple-theme/ <MY BLOG NAME>Add extra directories that should be ignored to .gitignore:
cd <MY BLOG NAME>
echo -e  "\n.bundle/\nbin/\nvendor/\n" >> .gitignore
If you don’t want to install node.js, which is used to compile the javascript parts, I recommend you add therubyracer to your gems, stringex was used by some dependency, I don’t remember which one, and rake to separate it from the system version, just in case:
echo -e  "\ngem \"therubyracer\"" >> Gemfile
echo -e  "gem \"stringex\"" >> Gemfile
echo -e  "gem \"rake\"" >> Gemfile
Install the required gems. Using --binstubs is optional, but I highly recommend using the --path directive to isolate the gems need to run your site within a sub-directory, this will make the site much more portable across machines:
bundle install --binstubs --path=vendorEdit config.yml and fill it with your info, specially title, name, Twitter handle and stuff like that. Avoid changing images at this point and don’t worry about anything bellow the links section of the file, it’s too soon.
Test the setup running the following commands and then opening a browser tab on http://0.0.0.0:4000/.
bin/jekyll build
bin/jekyll serve
If everything went well you should have a static site with some of your info, customizing it’s look and feel and adding new posts is up to you. Basically your posts will be stored as Markdown files under the _posts directory, if you want to create a new post just run bin/rake new_post, follow the instructions and edit the file created. Running bin/jekyll build will generate the static files based on the templates and Markdown files, and store the final product in _site, and that’s the content will host on S3.
Michael’s instructions are super clear, I recommend you spend some time familiarizing yourself with it, it will give you a good grasp on the kind of posts and pages you can create, he has sample post pages of many types here, just take a look and follow the examples that are inside _posts directory. By the way, before you start for real, delete the example posts and images :)
By the way, I echoed the strings on the scripts above to make it simpler, but you can edit the files manually if you wish.
At this point I recommend you store your site on source control, I use a public GitHub repo for that (thanks octopeople!). Another “option” is to move the directory to your Dropbox folder or something like that, but YMMV. If you’re using git, all you need to do to setup the blog environment on another machine is to clone the repo and run bundle install --binstubs --path=vendor and you should be up and running, that’s what I do across my machines, and because we’re using the --path=vendor option it won’t pollute your environment with blog related gems and won’t need root access as some systems run with system gems, like Mac OS. Quite neat.
Hosting the site on S3
Before we start, I’m assuming you already have a domain you can use, I’ll talk about registration and DNS settings on the next section, but you must at least know the domain before you start the process of setting up S3.
You can use S3 through the web interface, it’s pretty straight forward, but thinking about automating you life a bit, we’ll use the s3cmd instead, at least for the basic operations. First you need to install it, you can follow the instructions on their site or just use apt-get install s3cmd on Ubuntu or brew install s3cmd on Mac, I’m assuming you know how to use these package managers.
Once it’s installed you should run s3cmd --configure and follow the instructions to set it up, basically providing your AWS credentials. Once this is done you can run s3cmd ls and see a list of all your S3 buckets, which are akin to directories in object storage lingo, and this should be enough to guarantee it’s properly setup.
Here’s the procedure to crate a bucket for our site and push our static web site there:
cd <MY BLOG NAME>
s3cmd mb s3://<YOURDOMAIN>_log
s3cmd mb s3://<YOURDOMAIN.COM>
s3cmd accesslog --access-logging-target-prefix=s3://<YOURDOMAIN>_log s3://<YOURDOMAIN.COM>
s3cmd sync _site/ s3://<YOURDOMAIN.COM>
Notice that you need to replace <YOURDOMAIN> and <YOURDOMAIN.COM> with you info, in my case it was mindthecloud_log and mindthecloud.com. **The
A very important remark on the sync command above: it’s sync _site/, the last / is necessary so it will synchronize the directory into the bucket instead of creating a subdirectory called _site inside it and then update stuff. I lost count of how many times I forgot this stupid detail.
A note regarding regions, the commands above will create the bucket on US EAST region, S3’s default region, which should be good enough for most people. If you want to host your data on other region either create the buckets through the web interface and set the right region or add the --bucket-location=<YOUR_REGION> to the s3cmd mb commands above, you can find more info on the tool man page (or s3cmd --help).
We’re almost there, the buckets are created and populated with our site, we’re just missing some configs. First set the bucket policy by navigating to the S3 bucket we created above on the web interface, click on the bucket’s spyglass, open the “Permissions” tab, and click on “Edit bucket policy” button:
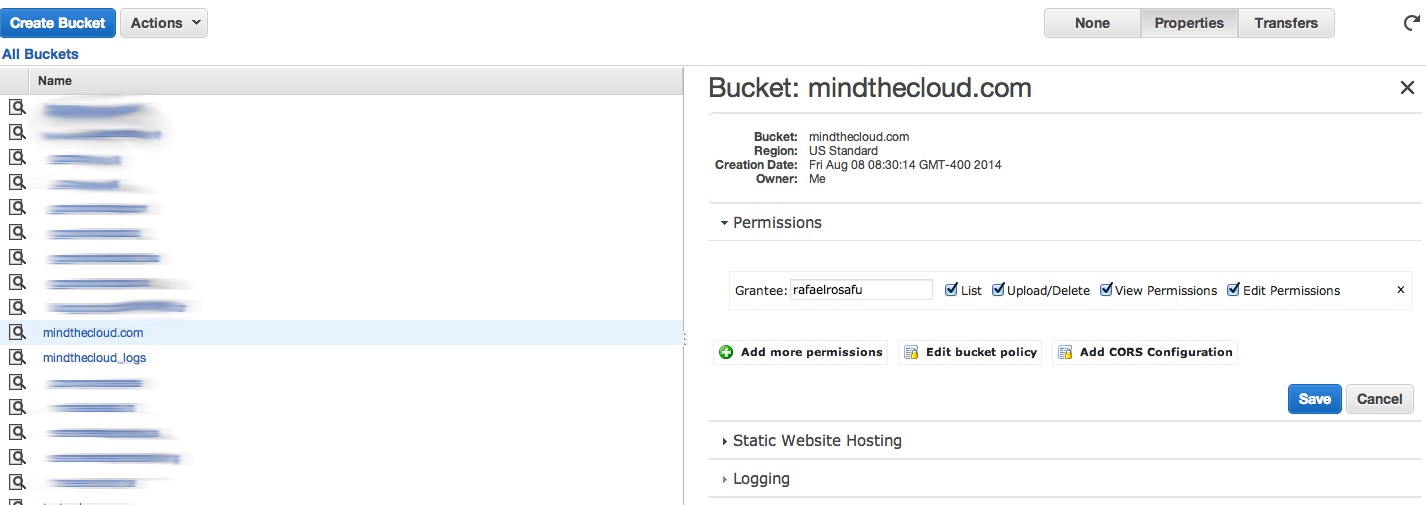
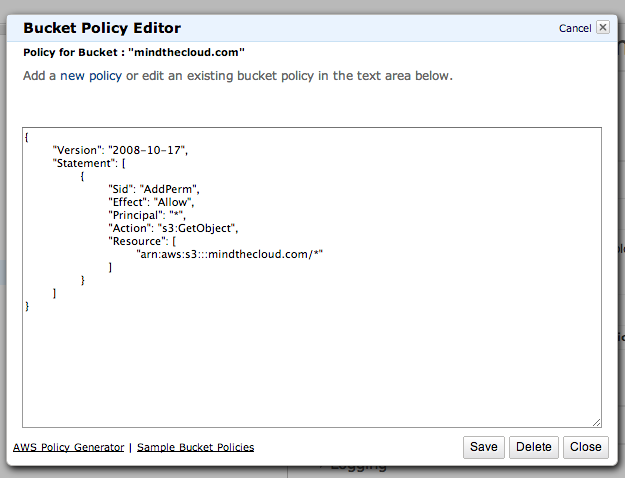
Then copy and paste the template bellow, changing the value of
{
	"Version": "2008-10-17",
	"Statement": [
		{
			"Sid": "AddPerm",
			"Effect": "Allow",
			"Principal": "*",
			"Action": "s3:GetObject",
			"Resource": "arn:aws:s3:::<YOURDOMAIN.COM>/*"
		}
	]
}
It should look like this:
Click on “Save”, now we just need to tell S3 to serve the content. Open the domain bucket’s “Static Website Hosting” panel, mark the option “Enable website hosting”, set the “Index document” to index.html, the “Error document” to 404.html and hit “Save”. It should look like this:
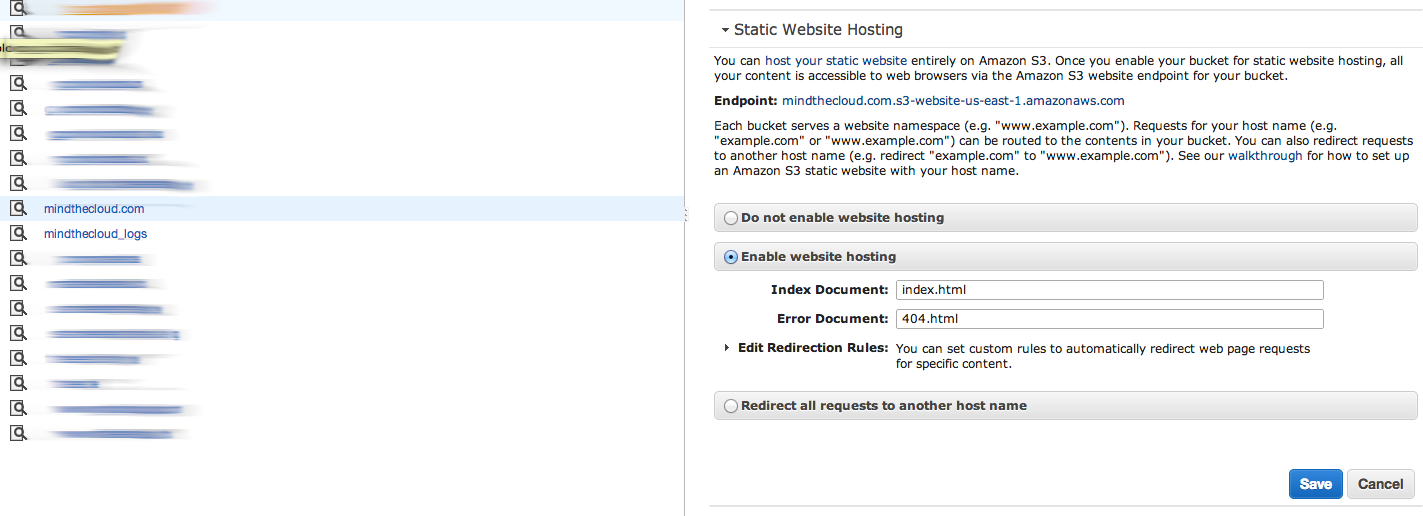
Now you should have a link called “Endpoint” that you can see on the image above, this is the S3 public web link from where the pages will be served, open a browser tab and navigate to it, you should see the static site we uploaded, which means we’re done tweaking S3. We’ll use the same endpoint URL to configure CloudFlare as described in the next section.
Preparing your domain
Now that the basic site skeleton is up and running, let’s prepare your domain. Whenever you register a new domain, the registrar usually providers a basic DNS service and hosts the records for you, most often than not they are really basic and their management interfaces are awful, so I recommend moving to a reliable and nice service, CloudFlare.
In my case, I didn’t have this domain, mindthecloud.com, so I needed to register it first. In the past I used Namecheap, despite the awful name their service is ok and so are their prices, but their management interface is one of those ugly things I mentioned. I decided to use a brand new service offered by AWS, domain registration through Route 53, and I was very impressed. The process is simple and efficient, very Amazon.com like, I used the recommend default on all options, and I had everything up and running in 5 minutes, including DNS propagation. I won’t go into the details, it’s self explanatory, the end result is a domain like this:
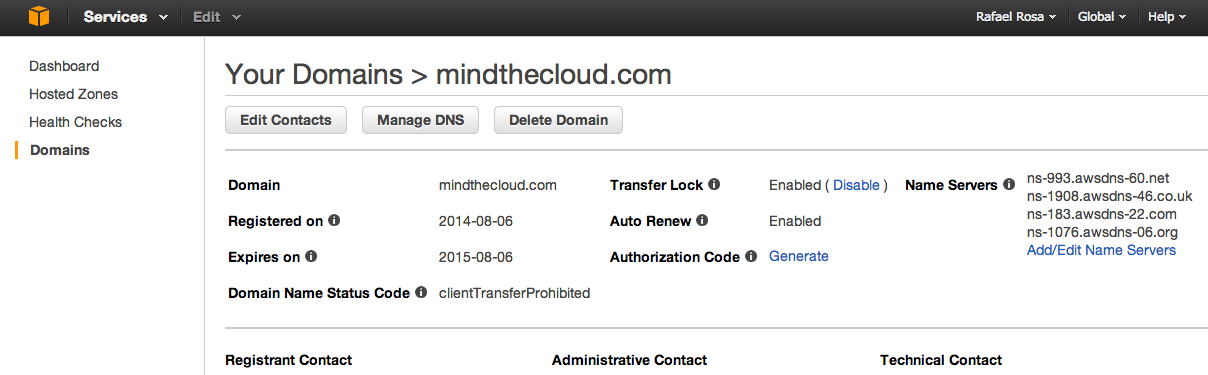
It should be accessible by running whois <YOUR DOMAIN>, you should see your name and AWS contact info, assuming you’re using the privacy feature, which is on by default.
The next step is to make CloudFlare the name server for your domain. By managing your DNS records they can automatically configure their CDN to cache your data and speed up your site considerably, while at the same time cutting your S3 data transfer costs, since they will take the brunt of the traffic and you won’t be billed $0.12/GB, which would probably be dirty cheap for a static web site, as long as your assets are small, but I’ll talk more about that in another post.
Go to CloudFlare’s dashboard and click on the “Add website” button show on the image bellow:
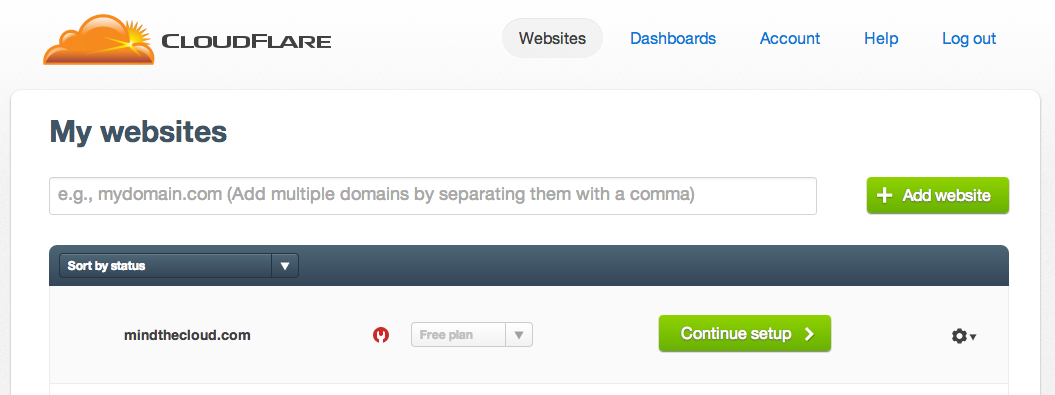
CloudFlare will check your current DNS records and import the existing records, making you life easier. After that you should click on the “Continue setup” button, also shown on the image above. It will show you the records it read from the DNS import process and ask you to add other records if necessary. If you’re going for a basic blog, where the main domain is the whole site, all you need to do is to setup the root/apex record. You can do it easily by creating a CNAME record with @ as name and then fill “is an alias of” field with the endpoint URL provided by S3, the same we used before to see if the blog was up, and click on “Add”. It should look like the image bellow:
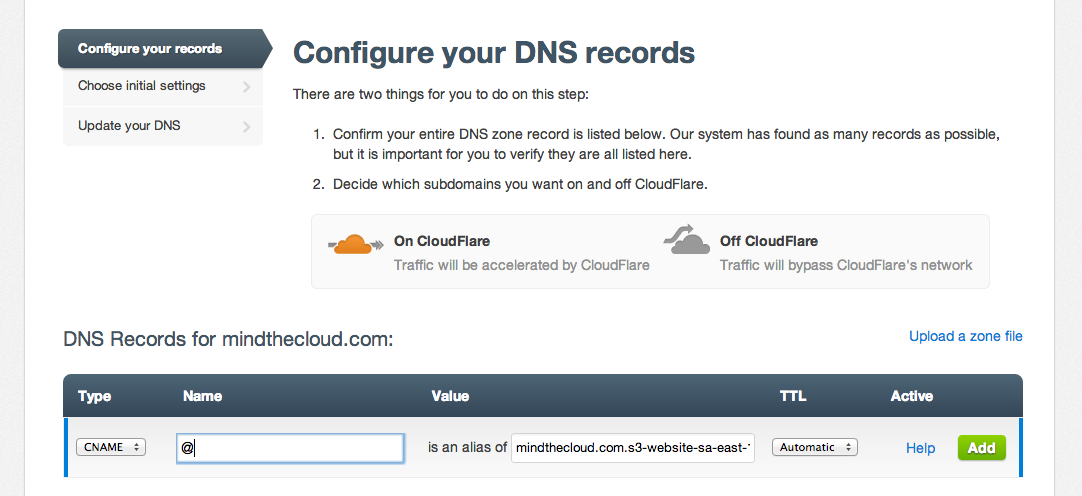
This will point the apex domain to the S3 bucket we’ve setup, scroll down and click on “I’ve added all missing records, continue”, and CloudFlare will ask what kind of service they should provide. I recommend you choose the CDN-only option to start (their compression sometimes breaks websites) with and avoid super secure options, medium security is enough for 99% of the cases and you don’t really have a lot to loose so far. Proceed to the next step which is the actual DNS update.
At this point you’ll be asked to change the name servers user by your current registrar, CloudFlare will provide you 2 names, they are human friendly names with an interesting back-story, mine are sue and will, just replace your current name server with them, make sure there are no other name servers but the CloudFlare’s ones.
The instructions to actually do this vary between registrars, CloudFlare has support instructions for many registrars with specific instructions and even some including screenshots, find yours on the list or adapt the instructions to your case, it isn’t super hard. For Route53 it’s pretty simple, just go to Route53 domain management panel, choose your domain and click on “Add/Edit Name Servers”, you can see the link on the first image of this section.
Once this is done you will need to wait some time until the new name servers are propagated, which can take between 5 minutes to 48 hours depending on your registrar, in my case AWS (in fact Gandi.net, which is the registrar they are using under the covers) took 5 minutes, Namecheap used to be fast too, but there’s no way to tell. To check if you’re DNS is propagated, run:
dig  +short NS <YOURDOMAIN.COM>

# if you run against my blog you'll see CloudFlare's servers:
dig  +short NS mindthecloud.com
  will.ns.cloudflare.com.
  sue.ns.cloudflare.com.
With the DNS propagated you should be able to open a new tab, navigate to http://<YOURDOMAIN.COM> and see the static site, we’re done!! (almost)
Try to change something on the site, like changing values on _config.yml, creating a new post with bin/rake new_post or tweeking the CSS (not recommended). After that run the commands bellow and you should be able to see the changes on the web site in seconds:
bin/jekyll build
s3cmd sync _site/ s3://<YOURDOMAIN.COM>
CloudFlare’s cache invalidation is pretty good, but if you update the site and the changes don’t show up after a couple minutes, you have 2 options: 1. Make sure your browser cache isn’t the problem, clear it and reload before screaming at me or CloudFlare’s support 2. Go to CloudFlare’s websites, click on the gear related to your website, select “CloudFlare settings” and inside it click the button “Purge cache”, it will force the content invalidation at the CDN POPs.
You can stop here if you want, but I’m going to give you some extra tips on what you can do to make your new static website as good as any Wordpress installation.
Extras
Configuring Google Analytics and Webmaster tools
This is pretty easy, login into Google Analytics, create an account if necessary, it’s free. You’ll need to create a new “property”, their lingo for site that you administer, I spent some time hunting for the button, here’s the path: click on “Admin” at the top of the screen, inside you’ll see 3 columns, the middle one is called “Property”, open the drop down and click “Create new property”, then just follow the wizard. At the end of the process you’ll be given a “Tracking ID” that looks like UA-9999999-9, just update _config.yml with it, rebuild and sync the site and you’re done.
Webmaster tools is similar, but they will eventually require you to do something to prove you own the site. One of the options is to generate a token that you need to put on your website body, if you follow this route there’s a google_verify key on _config.yml put the confirmation code on it, rebuild and sync the site and then follow the webmaster tools wizard to check it. Another option is to add a TXT record on your DNS, which is the one I did for this site. You can see what it looks like on the last image of this post.
Setting up comments with Disqus
It’s also pretty simple, all you need to to is sign up for Disqus, which basic product free, and create a new site by visiting https://disqus.com/admin/create/ once you’re logged in. I’m giving you the URL because the interface isn’t super friendly, at least for me. Follow the instructions of the wizard, the “unique Disqus URL” is the code you’ll need, update the key disqus_shortname in _config.yml, rebuild + sync and you’re done.
Note that comments aren’t enabled by default on So Simple Theme, you need to add the key-value comments: true on the top of the posts you want to enable comments on. If you’re using bin/rake new_post this key will be already there but with an empty value.
Setting up monitoring with Uptime Robot
Keeping track of your site availability is quite useful and simple with Uptime Robot, all you need to do is sign up for free, and create a new check. Use the HTTP check option, not the ping one, you don’t have a real server to ping, this way the system will visit the site every 5 minutes and check if it’s up. If you have an outage it will send you an e-mail when the service goes down and another when it’s up, with the total outage time, super simple and useful. Make sure their e-mail don’t fall into spam.
Configuring e-mail forwarding
I want to have e-mail with my own domains, but I won’t even try to keep my on e-mail server, it’s not worth the hassle for a couple e-mails per year. Instead I’m using PObox, a e-mail redirection system that charges $20/year to keep aliases, in this case I’m forwarding them to my Gmail account. All you need to do is create an account, setup the aliases you want and update your MX DNS records with PObox MX addresses.
Here’s my DNS config for this site, including PObox servers, so you can have an idea of how it will look like as a finished product:
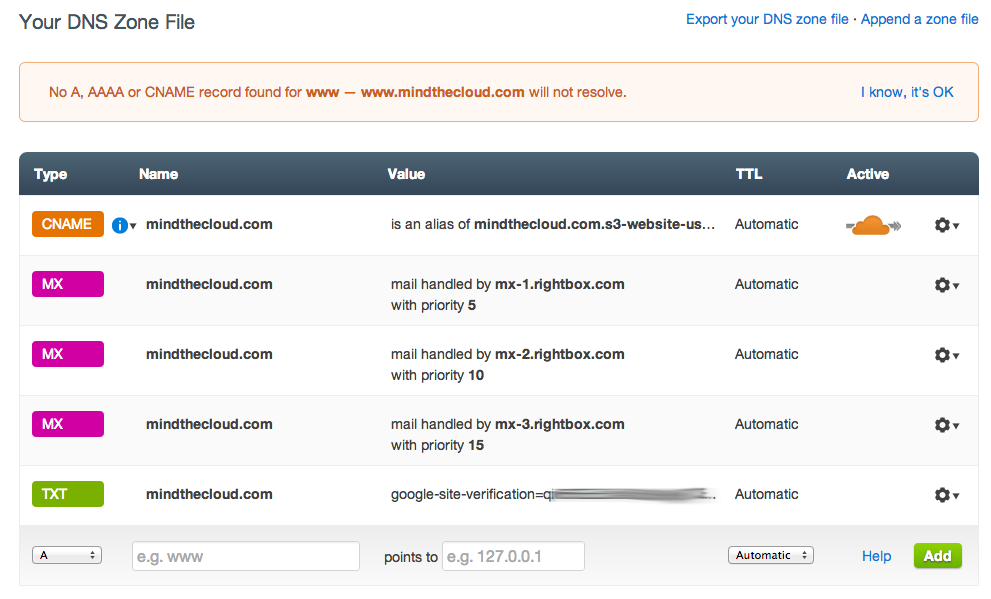
Notice that each PObox server has a different priority. The user interface of the site is a bit confusing at times, but the service is pretty good. I suggest you try to send e-mails to the aliases you create after it’s setup, but don’t do it from the e-mail you are aliasing, in my case gmail, or it won’t work. Use another e-mail account or ask somebody else to do it, it’s weird but that’s life.
If you know about an alternative to them I would be happy to try.
Summary
It was long and a bit tedious, but in practice you won’t spend more than 1 hour doing this, as long as you’re familiar enough with the tools, it isn’t rocket science. We didn’t cover 100% of the topic, other things like hosting big media files, like the MP3s I use on my podcast, deserve a separate post, but this is enough for now.
I would like to thank Randy Bias for incentivizing me to write this up and giving me some feedback. He suggested me to add some IAM items to it but it deserves a separate.
Feedback, corrections and suggestions are welcome. Leave them bellow or reach me on @rafaelrosafu.